How To Wear a Wig: Guide for Beginners in 5 Easy Steps
If you’re new to wearing wigs, putting on a wig for the first time can be an exciting yet daunting task. Whether you want to change up your look without commitment or experience hair loss and want to feel like your best self, we’ve got you covered. We’ll teach you not only how to wear a wig, but how to properly care for your wig so it continues to look as beautiful as you are!
If you would like a more hands-on approach to learning how to put on a wig, you can book an appointment with a local hairstylist who specializes in wig installation.
Ready to learn how to put on a wig? Here’s what you need to get started:
- A wig cap
- Wig wire brush or regular brush
- Gel, mouse, or spray bottle of water
- Bobby pins
- Hair ties
- Wig glue
- Wig tape
- Wig clips
- Your wig
We’ll walk you through the process step-by-step so you can be a wig-wearing pro.
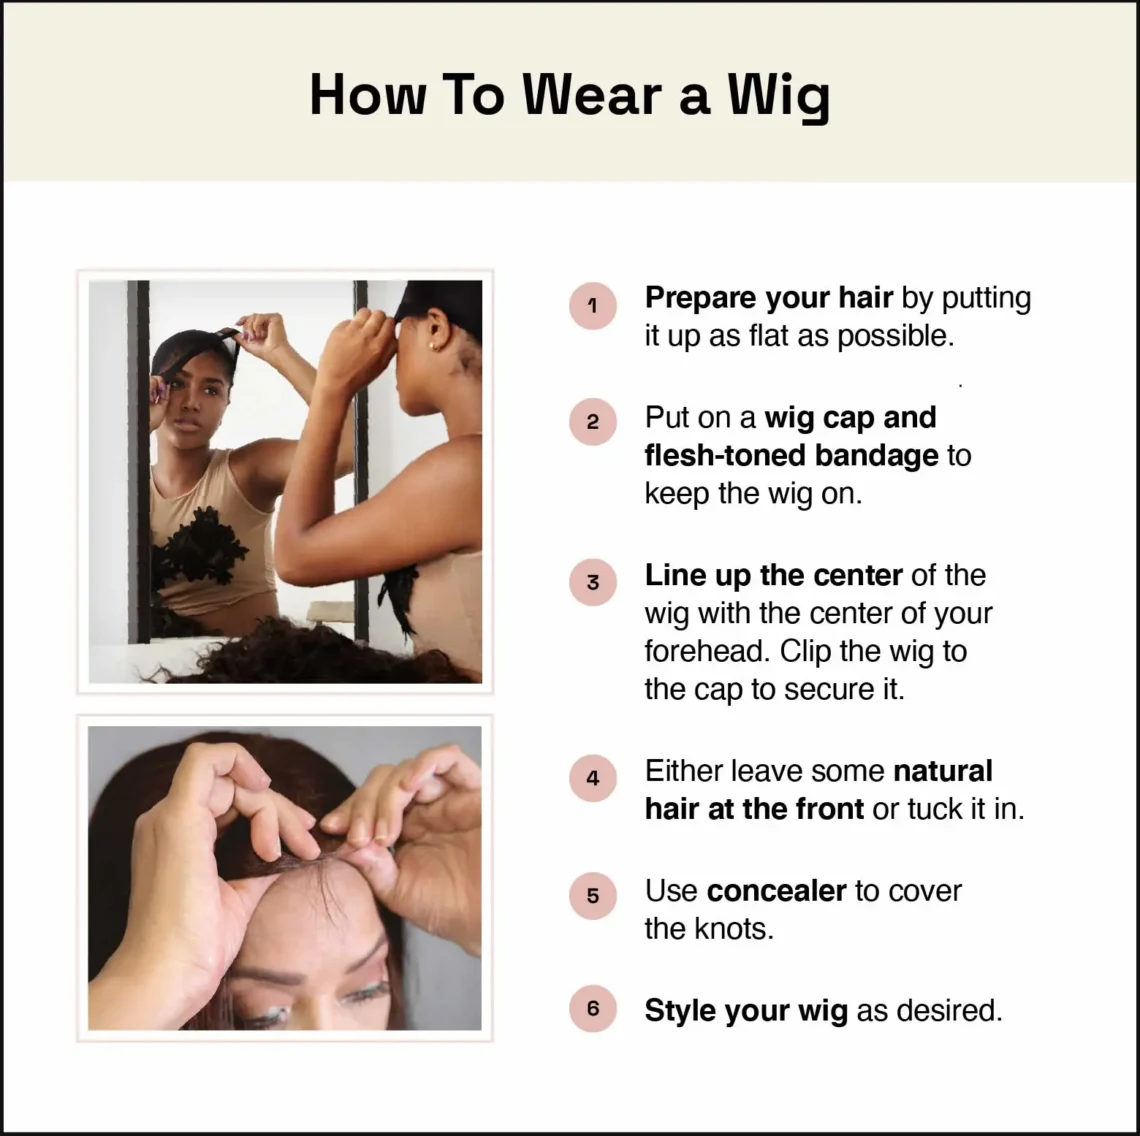
1. Prep your hair
The trick to your wig fitting properly is to get your natural hair as flat as possible. Having bumps in your hair will create bumps in the wig and may not make it feel as secure.
For short hair:
- You can either dampen your hair with water or use a gel or mousse throughout your hair.
- Brush your hair back and pin it in place with small bobby pins.
For long hair:
- Dampen your hair with water to make it easier to braid or style.
- To prepare your hair, you have several options:
- Put your hair in a low ponytail and pull the tail up over your head when you put on the wig cap.
- Braid your hair in two to four braids, depending on your hair thickness. Wrap the braids evenly around your head and secure them with bobby pins.
- If you have type 3 or 4 hair, we recommend putting your hair in cornrows.
Tip: Make sure your bobby pins feel secure and lie flat on your head. You can also use toupee clips that are a bit larger if you have a lot of hair.
2. Apply the wig cap
| Cap Size | Head Circumference |
| Child | 19″ (48.3cm) |
| Petite | 21″ (53.3cm) |
| Petite/Average | 21.5″ (54.6cm) |
| Average | 22″ (55.8cm) |
| Large | 23″ (58.4cm) |
We highly recommend pairing your wig with a wig cap liner. Wig caps help protect your sensitive skin while extending your wig’s life span by protecting the wig against natural oils. There are three types of wig cap liners to choose from:
- Cotton: This material is breathable and soft. It’s best for those dealing with hair loss who don’t want a lot of friction on their hair.
- Nylon/mesh: This material is sheer and thin. It’s best for those who don’t want to feel a lot of layers on their head and those who have hair.
- Aloe vera/bamboo: There are wig caps made up of either aloe vera, bamboo fibers, or a combo of the two. They’re comfortable yet durable. Plus, bamboo has moisture-wicking properties, which is ideal if you want to wear a wig during the summer months.
The next step is applying the wig cap to your head. Be sure to use the right cap size — if it feels too tight or loose on your head, it may not be the correct size.
- Start at the back of your head and wrap the wig cap over the top, so it sits firmly on your hairline.
- Tuck in any loose ends and flyaways underneath your wig cap.
Tip: Choose a wig cap close to your skin tone to make your hairline appear as natural as possible.
3. Secure with your method of choice
There are many ways to secure your wig — it just depends on what you’re comfortable with.
- Wig glue: Wig glue is a popular method to use among those experienced with wearing wigs, especially lace front wigs. Apply a wig glue, like got2b Glued Blasting Freezing Hairspray, along your hairline. Let the glue either air dry or blow dry on the cool setting before putting on the wig. When you place your wig on, press the wig edges on the glue.
- Wig tape: Wig tape mimics the effects of wig glue without the residue. Cut the wig tape into small strips, and place them along the inside of the hairline. When you’re ready to put on the wig, peel away the other side of the tape and gently place the wig onto your head. Once your wig is in prime position, apply pressure on the taped areas.
- Bobby pins: Bobby pins are notably the easiest way to secure your wig. Use bobby pins that mimic your wig color, so they’re less visible. Slide the bobby pins between your hair cap and your wig. How many you use will depend on how secure you want your wig.
- Wig clips: If you have sewing skills or want to learn, you may enjoy using wig clips or snaps. Sew about four to six clips along the inside of the wig. When you put on your wig, the clips will attach onto your hair or wig cap.
Tip: If you use glue or tape to secure your wig, wrap a scarf or band around your hairline to allow it to set.
4. Place the wig
You’ll want to use both hands when placing your wig. It may take a couple of tries to get the technique down, but the process will go smoother every time you do it.
- Put the wig behind your head. Start at the bottom, right above the nape of your neck, and pull the wig over your head.
- If you’re using glue or tape, gently press down on the wig hairline, so the wig connects to your own hairline.
- If you’re using clips or pins, you’ll want to start at one side of the wig and work your way around.
Tip: If your wig feels just a little loose, some wigs have adjustable tabs in the back that you can use to tighten the wig onto your head.
5. Adjust the wig accordingly
It’s important that your wig fits comfortably on your head. A good way to test your wig out to make sure it doesn’t fall off is by shaking your head.
Yep — shake your head around gently. If you feel some tilting or the wig completely falls off, you’ll probably need to add more clips or glue to keep it secure.
Once you feel that your wig is comfortable and secure, the last step is to be confident in your new hair. There’s no better accessory than inward confidence about your new look.
How to find the right wig for you
Any hairstyle, texture, color, and cut you see out in the world can likely be found in wig form. When stepping into a wig store or shopping online, you may get overwhelmed with the number of choices you have. Follow the steps below to help guide you through picking out the best wig for you.
Measure your head
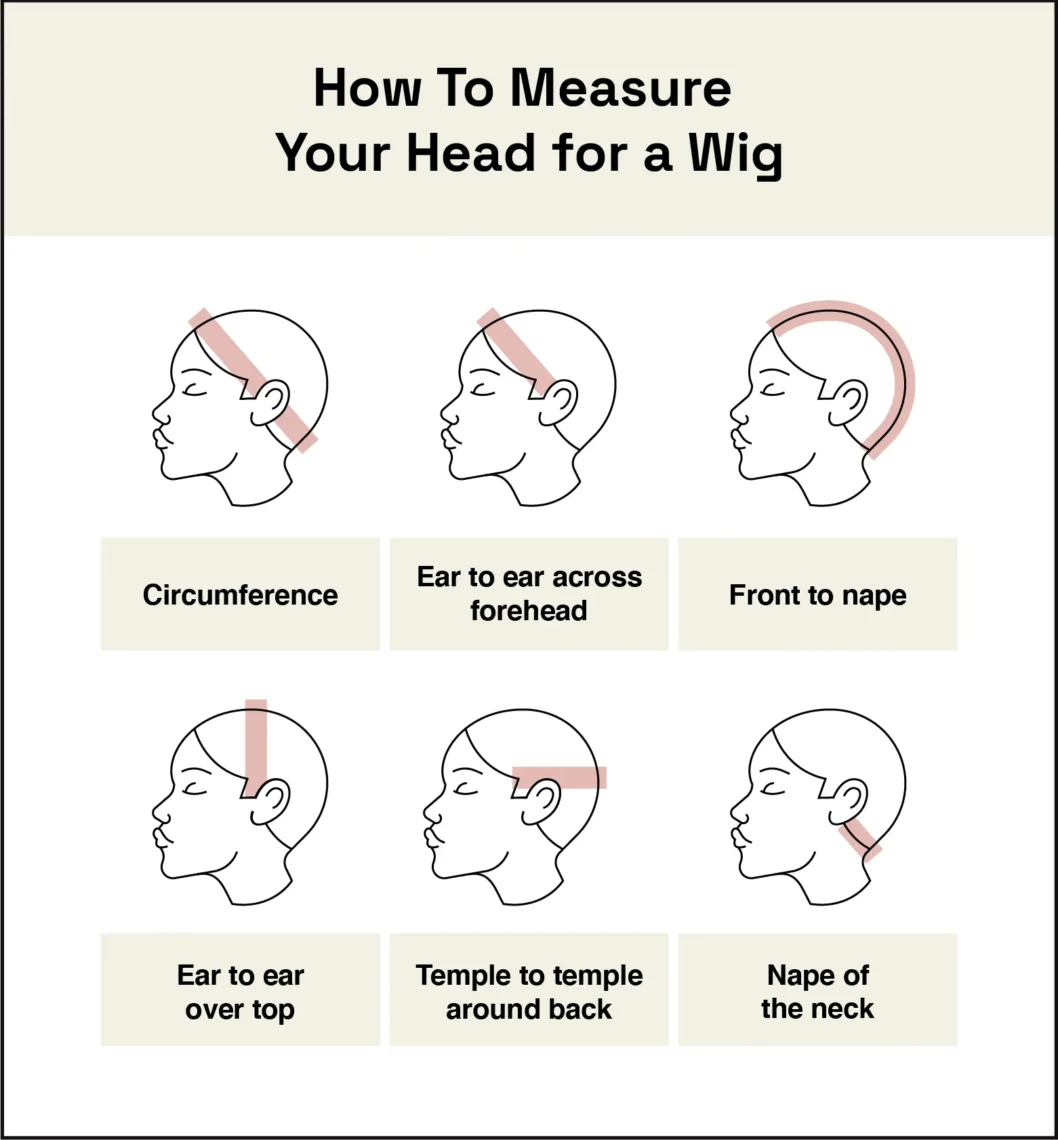
Did you know that all wigs aren’t the same size? To make sure your wig fits naturally and comfortably, you should first measure your head using a measuring tape. With your exact measurements, you’ll be able to find a wig that fits perfectly on your head. Here are the measurements you’ll need:
- Circumference: Wrap a measuring tape around your head, starting at the hairline and working around back to the starting point.
- Front to nape: Starting at the middle of your hairline, wrap the tape above your head and down to the nape of your neck.
- Ear to ear across forehead: Place your tape just above your left ear and run it across your hairline to just above your right ear.
- Ear to ear over the top of the head: Place your tape just above your left ear and run it over the center of your head to just above your right ear.
- Temple to temple around the back of the head: Place your tape on your left temple and run it behind your head to your right temple.
- Nape of the neck: Place your tape on the left side of the nape of your neck, slightly behind your ear lobe, and run it across to the right side of the nape.
| Measure in inches | Small | Medium | Large |
| Circumference | 21”-21.5” | 22”-22.5” | 22.75”-23” |
| Front to nape | 13”-13.5” | 13.5”-14” | 14”-14.5” |
| Ear to ear across forehead | 11.5” | 12” | 12.5” |
| Ear to ear over top | 12” | 12.5” | 13” |
| Temple to temple around back | 14.5” | 15” | 16” |
| Nape of the neck | 4.5” | 5” | 5” |
Most wigs just require a measurement of the circumference, front to nape, and temple to temple. However, for lace front and custom wigs, you’ll usually need to complete all six measurements for the perfect fit.
Choose your wig type
When shopping for a wig, you’ll come across three wig types: synthetic hair, human hair, or a combination of the two. When deciding between wig types, think about exactly what you’re looking for and your ideal wig style. The biggest factors that differentiate these types of wigs are cost, wearability, and maintenance.
- Synthetic hair: Synthetic wigs are the most affordable and don’t require much maintenance since they are pre-styled. You can’t use heat tools or products on synthetic hair, which limits your style options. However, they’re great if you’re looking for a wig to wear on occasion. The average shelf life of a synthetic hair wig is about three to six months.
- Human hair: These wigs are indeed made of human hair. These wigs tend to be the most expensive, but you’re able to style them any way you want — with color, cut, and heat tools. They tend to look the most natural, but require the most maintenance when it comes to cleaning.
- Combination hair: There are wigs that use a combination of synthetic and human hair. The price point tends to sit right in the middle between the two types, so if you’re looking for a natural-looking wig without spending too much, it’s a good choice. When it comes to using heat tools and products, you should read the wig’s specific instructions first before trying anything out.
You may have also heard of lace front wigs. Lace front wigs can be made of human or synthetic hair, and use a sheer lace base that helps the hairline look incredibly natural. Another pro of lace front wigs is that you can usually part your hair in any which way, whereas other wig types typically have one standard part.
Tip: Before making a purchase, picture how you plan to wear the wig. Are you looking for a fun wig style for a costume party? You’ll probably want to opt for a synthetic wig. Or are you looking for a wig you can wear daily and looks natural? You’ll probably enjoy wearing a wig with human hair.
How to style a wig
There are plenty of ways you can style your wig. The first thing you want to do when you receive a new hairpiece — whether it’s synthetic or human — is to shake it out. This helps to loosen out the hair and break up the hair fibers. Remember to be gentle when styling your wig and use wig-friendly products.
- Human hair: Human hair tends to be easier to style than synthetic. You should use detanglers and heat protectants when styling your hair. After brushing and applying products, you can gently use heat tools to get your desired look. Finally, finish your look with a light spritz of hairspray.
- Synthetic hair: Gently use your fingers rather than a brush or comb to detangle the hair, and only use products that are made for synthetic hair. The biggest difference between styling synthetic hair versus human hair is that you can’t use heat tools on synthetic hair. The only exception is if the wig is labeled heat-resistant.
Tip: Instead of styling your wig while it’s on your head, consider using a styling head so you can see all sides of the wig. This can make styling easier, especially if you have difficulty reaching the back of your head. Remember to use T-pins to secure the wig to the head when styling.
How to clean a wig
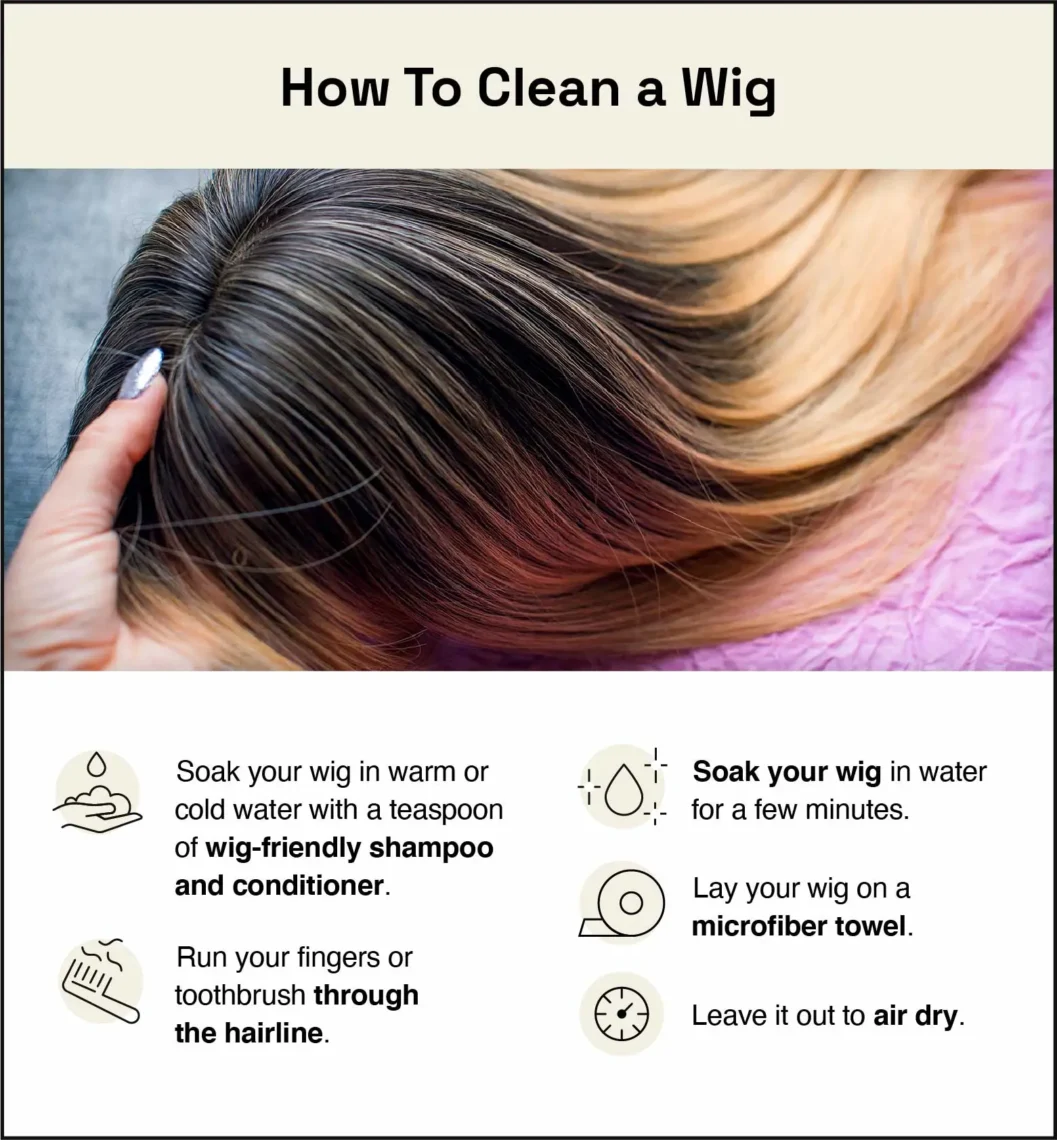
If you wear your wig daily, you should clean it bi-monthly to keep it looking fresh and new. However, if you wear it less often, you can clean it once a month or so.
Cleaning human hair:
- Soak your wig in warm water with a teaspoon of wig-friendly shampoo and conditioner.
- Run your fingers or a toothbrush through the hairline — this is especially important if you use wig tape or glue.
- Let your wig soak in the water for a few minutes, then rinse the product out.
- Lay your wig on a microfiber towel to remove any excess water and leave it out to air dry.
Cleaning synthetic hair:
- Soak your wig in cold water with a teaspoon of wig-friendly shampoo and conditioner.
- Run your fingers or a toothbrush through the hairline.
- Let your wig soak in the water for a few minutes, then rinse the product out.
- Lay your wig on a microfiber towel to remove any excess water and leave it out to air dry.
Note: The ideal way to clean your wig is to follow your specific wig’s instructions. Although there are two basic types of wigs, each one may come with different guidelines that differ slightly from the tips above.
How to remove wig glue
Wig glue can help make sure your wig stays on all day. However, removing wig glue from your wig, especially a front lace wig, can be tricky. You can use the following products to remove wig glue:
- Alcohol-based solution: Before using rubbing alcohol, we recommend doing a patch test to test for sensitivity. If you don’t have any reaction, wet a microfiber towel with the alcohol and, gently rub it on the wig edges. Let it sit for up to a minute and gently pull the wig up at the edges. Once your wig is off, remove the remaining glue with an alcohol-soaked towel or cotton swab.
- Emollient oil: Wipe an emollient oil, like Vaseline, on the hairline. Leave it on for several minutes, and then use a wet towel to wipe off the oil. This step may need to be repeated several times to fully remove the wig glue.
- Lace front wig glue remover: If you’re removing a lace front wig, there’s specialized remover you can use that will help prevent damage to the lace. You’ll want to dip a cotton ball or swab in the remover and gently rub it where you’ve glued or taped your wig. Let the remover sit for a few minutes, and then gently pull off your wig.
Tip: To remove glue from your wig, you should first wipe the existing glue residue with a damp cloth. Using a sponge soaked in rubbing alcohol, gently rub it on the glue and let it sit for a couple of minutes. Then proceed to wash the wig as usual.
How to wear a wig FAQ
Below are commonly asked questions about wearing wigs.
How long do wigs last?
Wigs can last from a few months to a couple of years, but it all depends on the type of wig you’re wearing, how often you wear it, and how well you maintain your wig. There are a few things you can do to extend your wig’s longevity:
- Be gentle: Wigs tend to be more fragile than your natural hair. We recommend brushing your wig hair before washing it to avoid damage or tangles. Using a brush or comb specifically for wigs, start at the bottom of the hair and work upward. This method avoids excessive shedding and knots.
- Store your wigs properly: It’s best to store your wigs on a mannequin head, pillowcase, or silk bag to avoid matting.
- Avoid ripping your wig: When removing your wig, avoid ripping it off without properly removing the gel or glue first. This will not only damage your wig, but may also damage your natural hair underneath. You should always use remover products to remove the adhesive first, and then gently remove your wig.
- Avoid overwashing: Washing your wig with products designed for wigs is important for making them last longer. However, avoid washing your wigs every time you wear them. We recommend washing synthetic wigs every seven wears, and human hair about every four to five wears.
The best tip for a long-lasting wig is to invest in a high-quality wig that’s specifically made to last. These wigs also tend to look the most natural and fit better than low-quality wigs.
Do you need to wear a wig cap under a wig?
It’s up to personal preference if you want to wear a wig cap under your wig or not. Some choose not to wear one during the summer months when it’s hot. If you have very short hair or no hair, it may not be necessary to wear a wig cap.
However, a wig cap does add a protective barrier to your head and can help grip your wig easier, depending on how you secure your wig.
Is it bad to wear a wig every day?
Wigs are meant to be a protective style and help promote hair growth. However, it’s important to remove your wigs at night to let your natural hair breathe. When wearing wigs, you don’t want to neglect your natural hair. Use oils, like jojoba oil, and moisturizing products to help nourish and grow your hair.
Do wigs fall off easily?
Wigs can’t fall off easily if they’re properly placed and secured. However, if your wig has air pockets, it means that it’s too big and you need to go for a smaller wig size. Also, if you don’t secure your wig using a method like bobby pins or wig glue, your wig may not sit on your head as well.
